Why do I need a diversity of natives in my yard?
Exerpt from The Chickadee’s Guide to Gardening: In Your Garden, Choose Plants That Help the Environment By DOUGLAS W. TALLAMY, MARCH 11, 2015 a professor of entomology and wildlife ecology at the University of Delaware, is the author of “Bringing Nature Home” Please google Douglas Tallamy.
“But local insects have only just met Bradford pears, in an evolutionary sense, and have not had the time — millennia — required to adapt to their chemical defenses. And so Bradford pears stand virtually untouched in my neighbor’s yard.
In the past, we thought this was a good thing. After all, Asian ornamentals were planted to look pretty, and we certainly didn’t want insects eating them. We were happy with our perfect pears, burning bushes, Japanese barberries, porcelain berries, golden rain trees, crape myrtles, privets, bush honeysuckles and all the other foreign ornamentals.
Playing God in the Garden : By planting productive native species, we can create life.
But there are serious ecological consequences to such choices, and another exercise you can do at home makes them clear. This spring, if you live in North America, put up a chickadee nest box in your yard. If you are lucky, a pair of chickadees will move in and raise a family. While they are feeding their young, watch what the chickadees bring to the nest: mostly caterpillars. Both parents take turns feeding the chicks, enabling them to bring a caterpillar to the nest once every three minutes. And they do this from 6 a.m. until 8 p.m. for each of the 16 to 18 days it takes the chicks to fledge. That’s a total of 350 to 570 caterpillars every day, depending on how many chicks they have. So, an incredible 6,000 to 9,000 caterpillars are required to make one clutch of chickadees.”
Why do I need to plant local-source native plants?
All native flowers are good food source for native pollinators like bees, butterflies and in turn, birds; they have evolved with one another. Fall blooming natives are especially important in nourishing the migrating insects and preparing the adults and caterpillars for winter. Cultivars from Box Stores are not good for wildlife.
The best plan for a pollinator garden is to plant a diversity of native plants; perhaps 30 different native species grown from a local seed source. It is important to read this article and some of the additional links provided within it. Enter this link: https://www.ecobeneficial.com/2015/07/why-locally-sourced-locally-grown-native-plants-matter/
In this case “local” means within 50 miles N<->S, and 100 miles E<->W. Consult a NPS member if you are enticed to get plants from beyond this region.
Find local professional assistance in the Grow Native Resource guide at www.grownative.org.
Within the Grow Native site, you will also find links to a Native Plant Database which not only lists hundreds of useful plants for your garden but explains the invasive plants and the natives with which you can replace them. There are over 20 articles explaining the need to plant natives for pollinators and birds, and a Seedling Identification page for 40 species commonly used in gardens so you won’t pull them up thinking they are invasive weeds.
Ask a member who talked to you at the booth or learn more by joining the local Hawthorn Chapter Missouri Native Plant Society at www.columbianativeplants.org
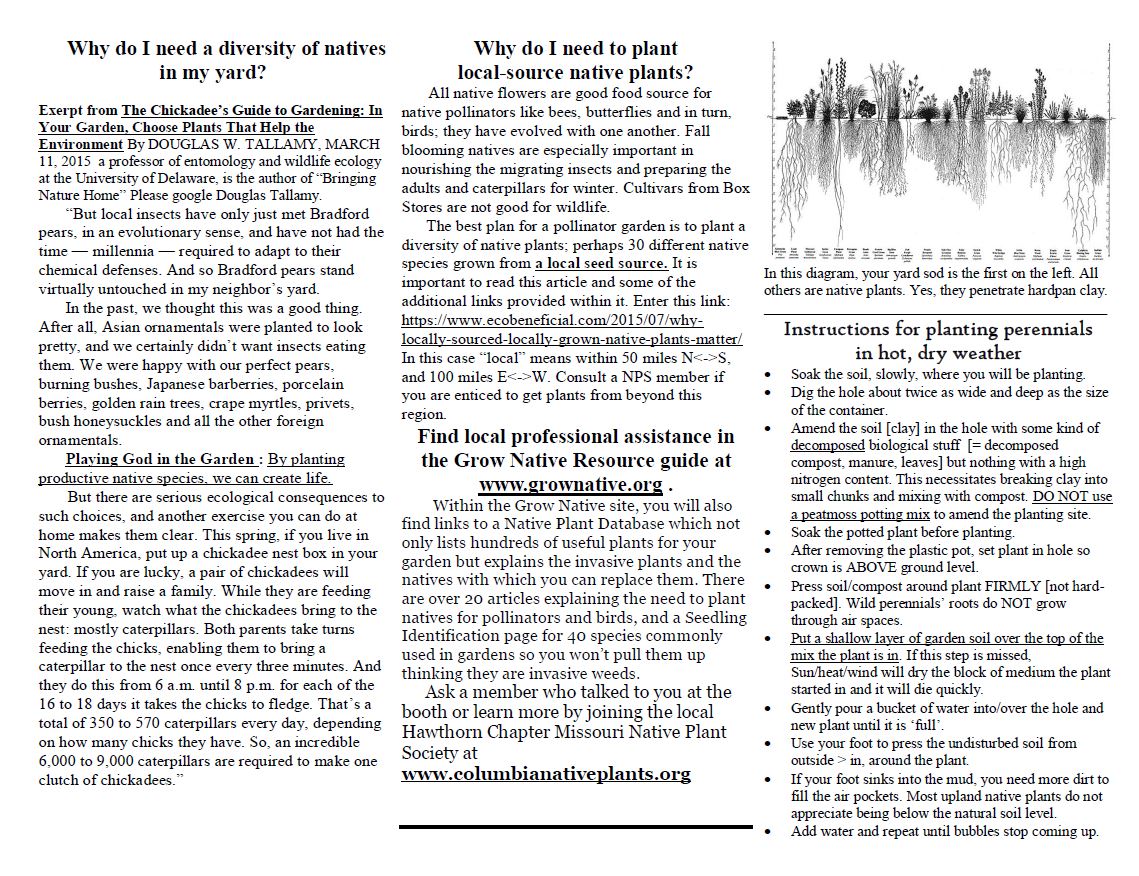
In this diagram, your yard sod is the first on the left. All others are native plants. Yes, they penetrate hardpan clay.
______________________________________________
Instructions for planting perennials in hot, dry weather
Soak the soil, slowly, where you will be planting.
Dig the hole about twice as wide and deep as the size of the container.
Amend the soil [clay] in the hole with some kind of decomposed biological stuff [= decomposed compost, manure, leaves] but nothing with a high nitrogen content. This necessitates breaking clay into small chunks and mixing with compost. DO NOT use a peatmoss potting mix to amend the planting site.
Soak the potted plant before planting.
After removing the plastic pot, set plant in hole so crown is ABOVE ground level.
Press soil/compost around plant FIRMLY [not hard-packed]. Wild perennials’ roots do NOT grow through air spaces.
Put a shallow layer of garden soil over the top of the mix the plant is in. If this step is missed, Sun/heat/wind will dry the block of medium the plant started in and it will die quickly.
Gently pour a bucket of water into/over the hole and new plant until it is ‘full’.
Use your foot to press the undisturbed soil from outside > in, around the plant.
If your foot sinks into the mud, you need more dirt to fill the air pockets. Most upland native plants do not appreciate being below the natural soil level.
Add water and repeat until bubbles stop coming up.
Usually about 3-4 gallons is enough to mulch each new plant. Cover the planting site with about 2-3 inches [ = second knuckle to crotch of middle finger]. Pull mulch away from crown of new plant.
Before successive watering of your new plant, stick a finger through the mulch to test for dampness. If clay comes out on the tip of your finger, the plant probably is OK. Soak plant if finger comes out clean. Water thoroughly if plant is droopy.
After a hard freeze, mark the plant. Sometime during the winter add 1-2 inches of mulch. Native perennials will come up through loose mulch. Wood chips keep nitrogen and weed seeds busy so they germinate weakly and are easy to pull if they come up at all.
Depending on the natural needs of your new native perennial and rainfall, you might not need any more care of your plant. Usually after 2 years, if your plant is thriving , besides mulching once each winter, it will need no more care.
Contact the Hawthorn Chapter of Missouri Native Plant Society www.columbianativeplants.org for more information. You receive regular information if you join the group. See site for membership options.
We reuse/recycle all nursery plastic if you bring it to one of our activities
Membership benefits
Learn to identify and grow native plants through field trips and workshops.
Field trips to see wildflowers and rich natural communities including glades, prairies, and forests.
Presentations by invited speakers at meetings.
Share information about the benefits of native plants.
Monthly newsletters from the Hawthorn Chapter and bi-monthly newsletters from the state MONPS.
Meet others who share these interests
“The purpose of the Hawthorn Chapter of the Missouri Native Plant Society is to promote the enjoyment, preservation, conservation, restoration, and study of flora native to Missouri, public education of the value of the native flora and its habitat, and publication of related information.” –– MONPS, Hawthorn Chapter, bylaws, Art.1, Sec. 2.
MEMBERSHIP FORM
Missouri Native Plant Society
Hawthorn Chapter
www.columbianativeplants.org
Membership Levels:
___ Student $11
___ Regular $16
___ Contributing $26 (designate extra for chapter or state contribution)
Includes both Chapter and State dues.
Annual renewal on July 1.
Make check payable to:
Native Plant Society.
Name _____________________________________
Address ___________________________________
___________________________________
Phone: Day ________________________________
Evening ________________________________
Email: ____________________________________
All communications will come by email unless you say you want the Petal Pusher to be mailed on paper at a cost of $10. Circle one.
Email Regular Mail
Send check and this form to:
Paula Peters
2216 S. Grace Ellen Dr
Columbia, MO 65202
Missouri Native Plant Society
Hawthorn Chapter
Promoting the conservation and enjoyment of the native flora of Missouri
______________________________________________
To View PDF Version Click Here


